
Web manual: GUI for your USB module (USB pushbutton/USB pushbox)
If you are familiar with programming, you probably already know how to install, connect, and program your pushbutton or pushbox “manually” via command lines and a serial terminal.The graphic user interface (GUI) on your mini CD or on our product page makes it easier to configure your USB module (includes both USB pushbutton and USB pushbox). Go ahead and see how the programming of your USB module via GUI works!
Contents
Configure your USB module without any programming knowledge!
Before customizing your USB module, you must install and connect the GUI. The GUI offers you two main possibilities to customize your USB module according to your purposes. The first one is to manually enter keys and key combinations into the dialogue “Key Probing and Tables”. This only works if you want the pushbutton or pushbox to simulate keys, but not full type strings, delays or other command types. The second possibility is to complete the command lines in your app by manually entering codes, strings and other commands into the interactive table in the main dialogue. This procedure works for all command types. The following sections present these two programming possibilities “step by step” and offer a variety of programming examples.
Programming keys for your USB module via ‘Key Probing and Tables’
The following steps show you how to configure the example “123” via the input field in Key Probing and Tables
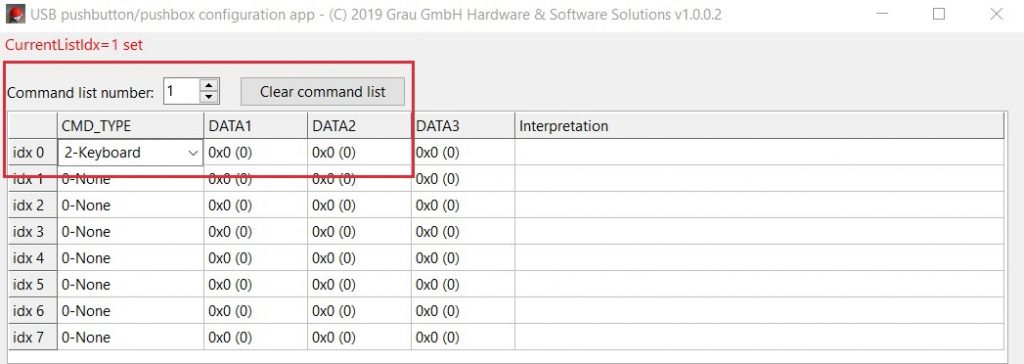
- Select command list 1 (the default list on button trigger) in the main dialogue.
- Click on Clear command lists and start with the first command entry “idx 0” if you want to want to enter a new configuration. If you already programmed command lists in the GUI, you can also start at another command list.
- Select the field DATA 1 within a list entry (idx 0 – idx 7). For a new configuration, start with “idx 0”. If you already programmed entries in the command list, you can also start at another list entry.
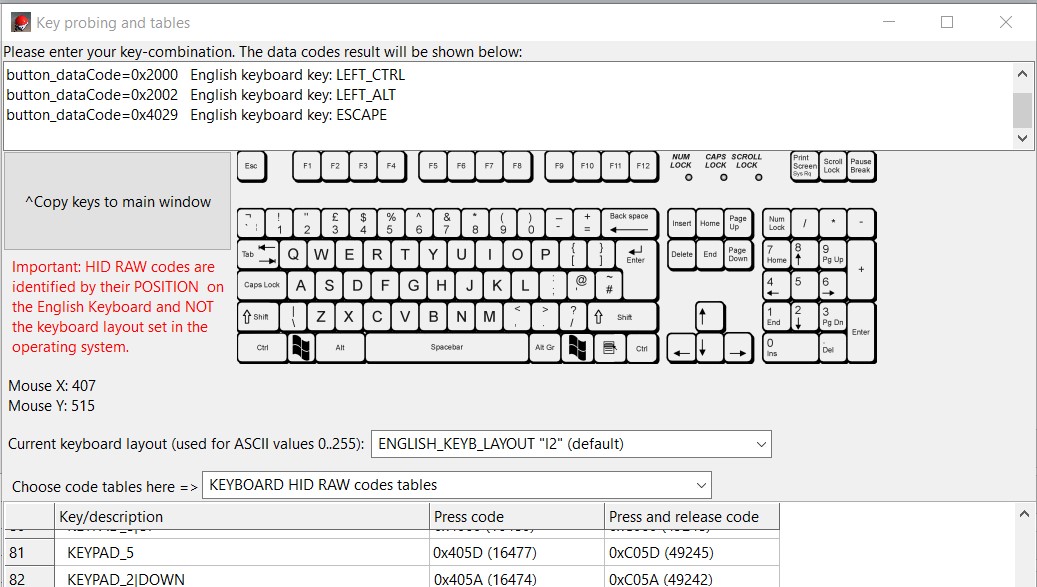
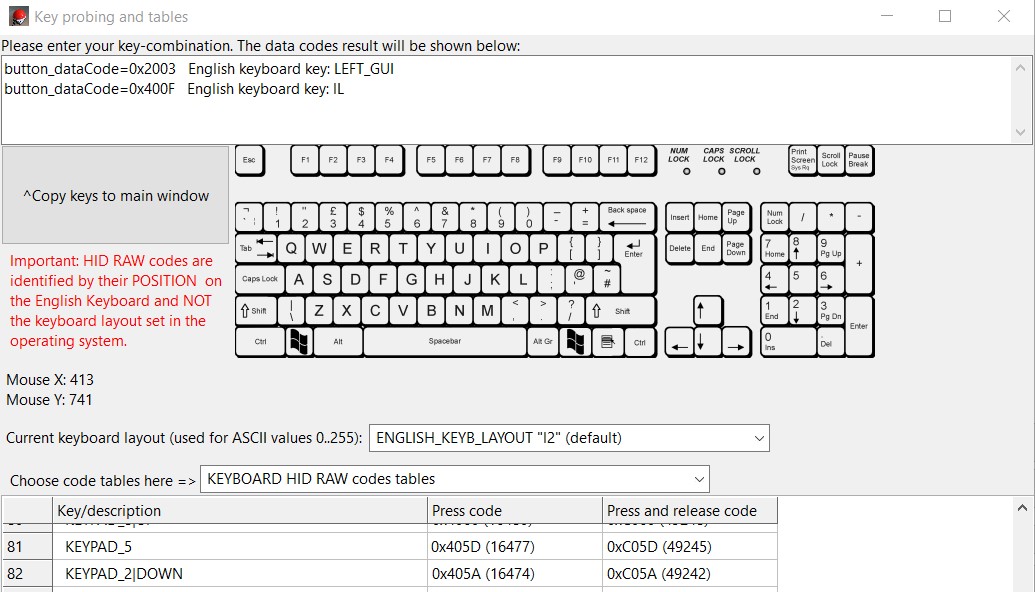
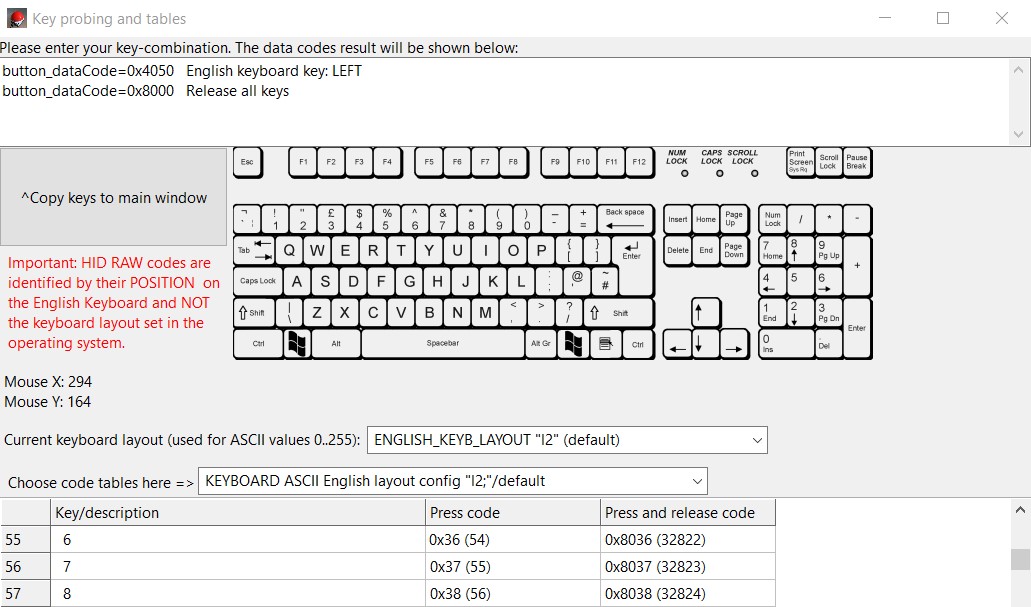
- Click on Key Probing and Tables in order to define your preferred keys.The GUI opens a second dialogue. This dialogue includes an input field for keyboard shortcuts, the button Copy to main window, an English keyboard image, a dropdown lists to select a keyboard layout and several tables with key codes.
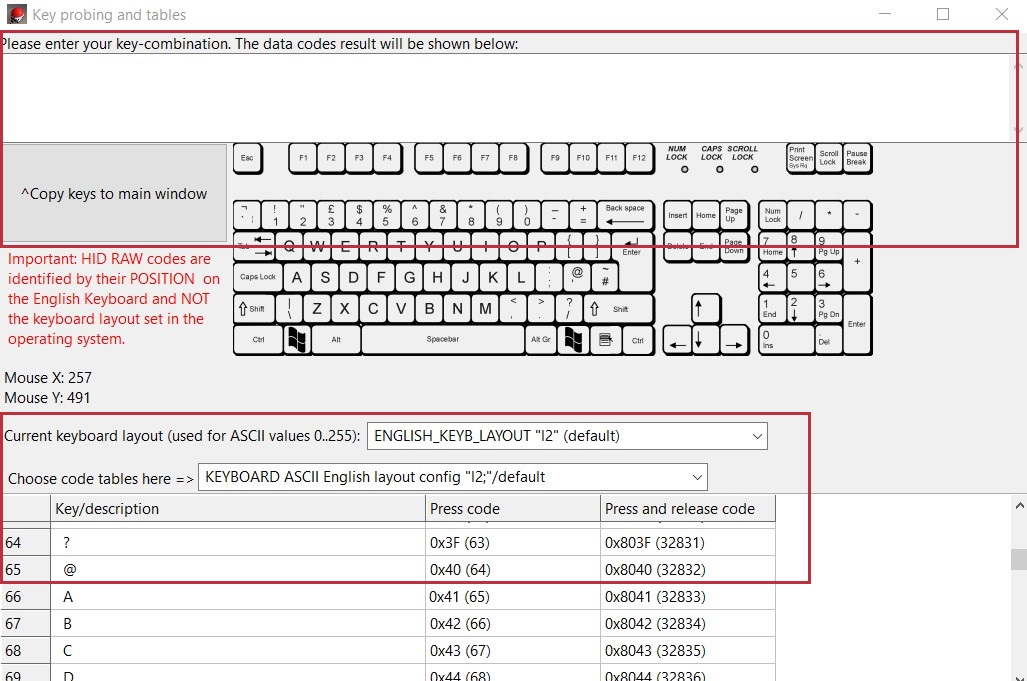
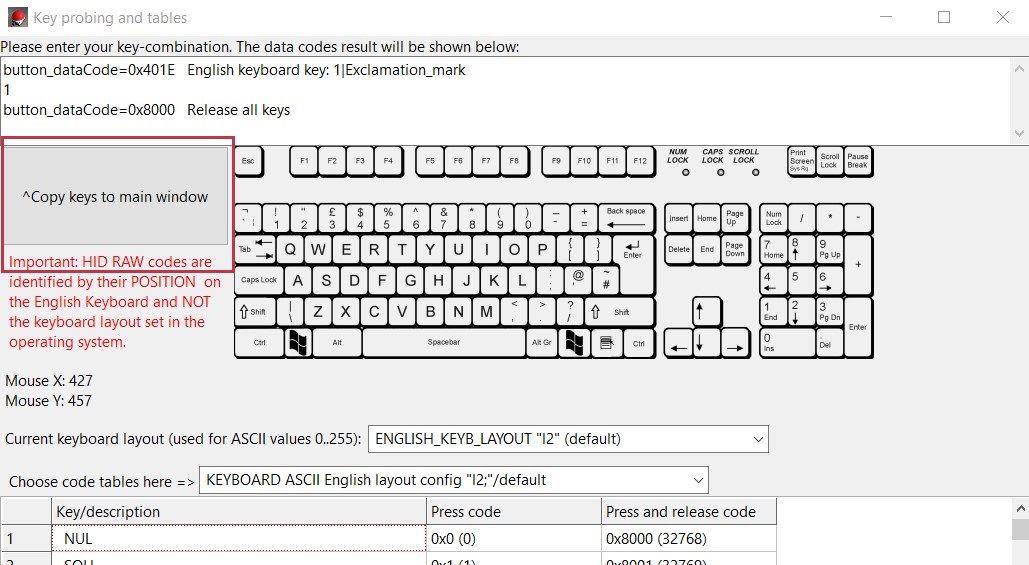
- Manually enter the key “1” into the input field.The GUI automatically displays the data codes result after all keys have been released.
- Click on Copy keys to main window to copy the data codes to the main dialogue at the selected position. Then return to the main dialogue by minimizing the window. An auto-release data code (“0x8000”) be automatically added after each entered shortcut.
- Repeat the steps 4 to 6 for the keys “2” and “3”.
Notice: If you only want to press the key, but do not release it before the next command, you must set the trailing data codes number “0x8000” (=”RELEASE ALL KEYS”) as “0x0 (0)” (=undefined).
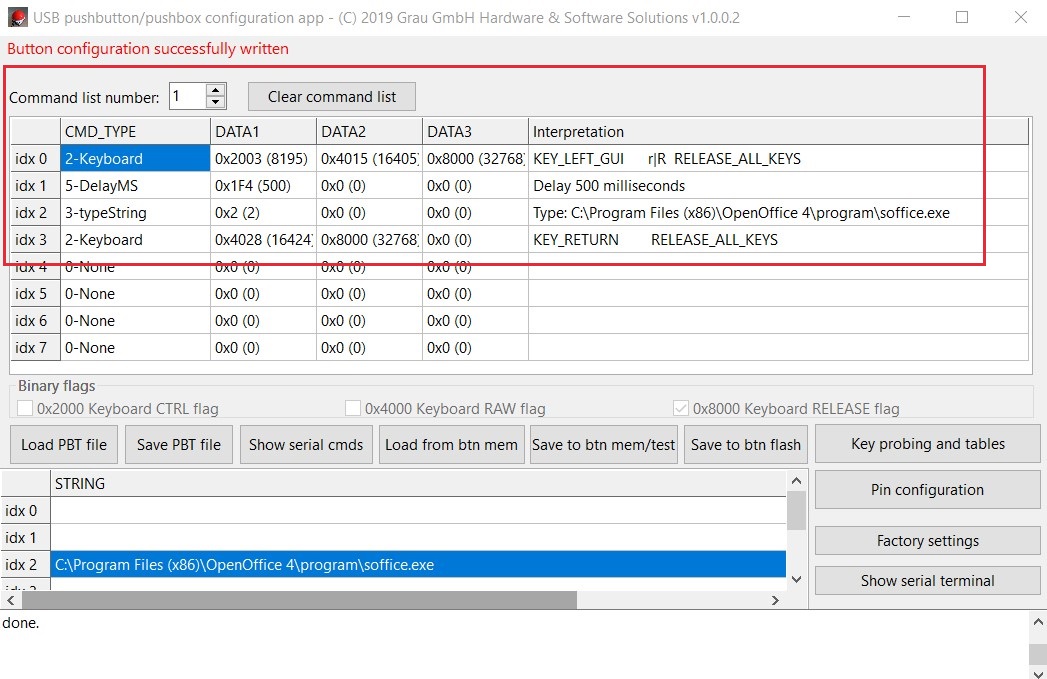
- Check the concerned command list entry (“idx+value”). The interactive chart with all command lists has adapted to the new configuration and displays it.
- Check the field Interpretation in order to view and verify your programmed operations.
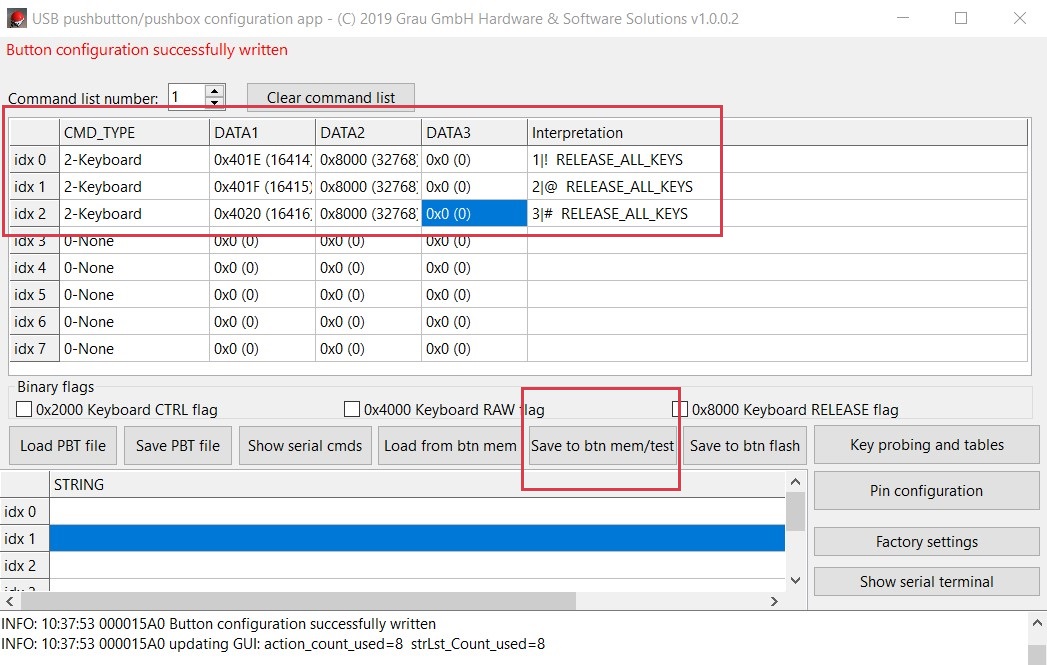
- Click on Save to btn mem/test in order to temporarily store your USB module’s new configurations for testing. The GUI saves the newly set configurations in your USB module’s internal memory without flashing the module. This means that you can still correct and adapt the configurations. If you want to revert to your original configuration you may also close the application, plug-out and re-plug the USB module.
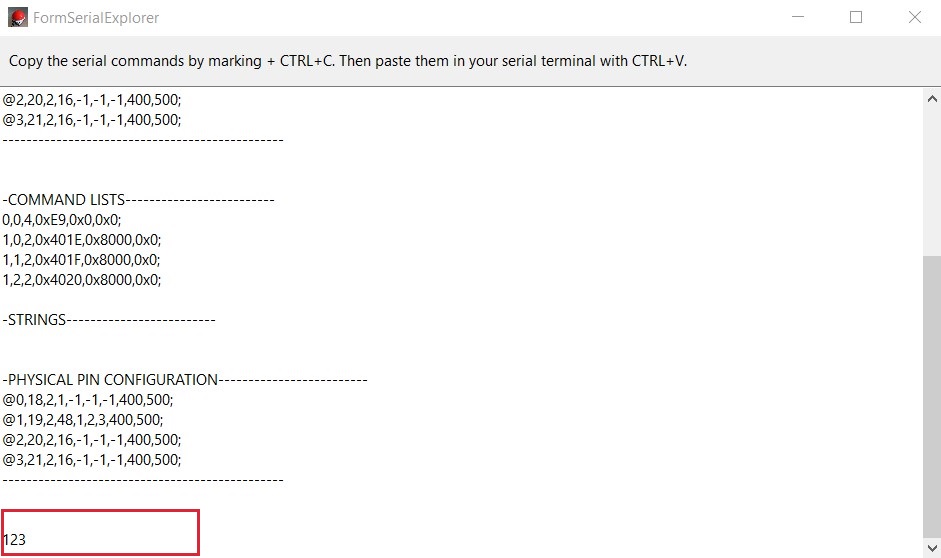
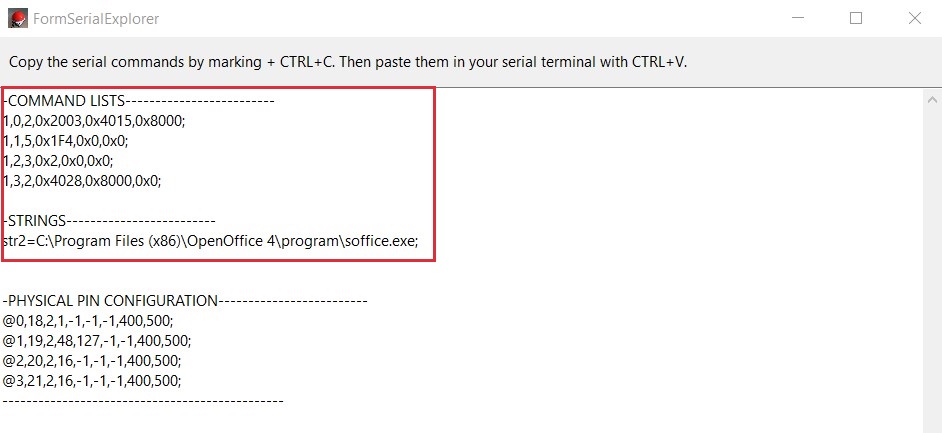
- Click on Show serial terminal or Show serial cmds in order to view and test your USB module’s new configurations within the GUI. Show serial cmds is a more compact terminal view which only contains the serial commands. Via Show serial terminal, you can view all configurations as full strings. You can also test keys in an external text editor.
- Push the button(s) included in your USB module in order to verify your programming success. In the best case, the USB module now simulates the key combination “123”. Otherwise, you need to correct your configurations, save and test them again.
- Return to the main dialogue.
- Click on Save to btn flash if you permanently want to save the new configurations in your USB module’s internal flash memory. Do not immediately flash the module if you are going to initiatiate any changes regarding the stored configurations.
You have successfully customized your USB module. The configurations for the key combination “123” have been stored in the module’s internal flash memory.
Entering codes and values for your USB module in the main dialogue
The following instructions show you how to programme the following key and string combination: “Windows + r, 500 ms delay, programme path, Return/Enter”. After programming, your file system is supposed to open the programme “OpenOffice” on the computer. All values shall be manually entered into the GUI’s selection table in the main dialogue.
- Select a command list.
- Start with the command list number 1 and click on Clear command lists if you want to want to enter a new configuration.If you already programmed command lists in the GUI, you can also start at another command list.
- Select a command type for an entry in the command list (idx + value). Within the column (also: index row) idx 0, select the field DATA 1 for configuration. It is always recommended to start with DATA 1 within an index row (left -right) and at idx 0 (top-down) unless you already configured any index rows.
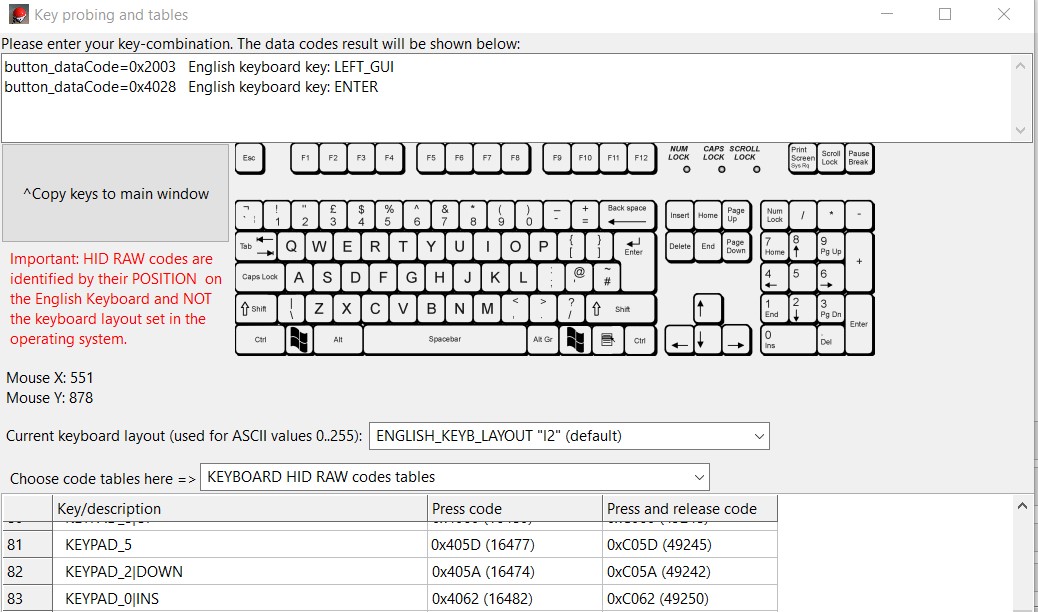
- Click on Key Probing and Tables in order to define the keys simulated by the field entries DATA1, DATA2 and DATA3.The GUI opens a second dialogue. This dialogue includes an input field for keyboard shortcuts, the button Copy keys to main window, an English keyboard image, a dropdown list to select a keyboard layout and several tables with key codes.
- Define a keyboard layout and a code table.

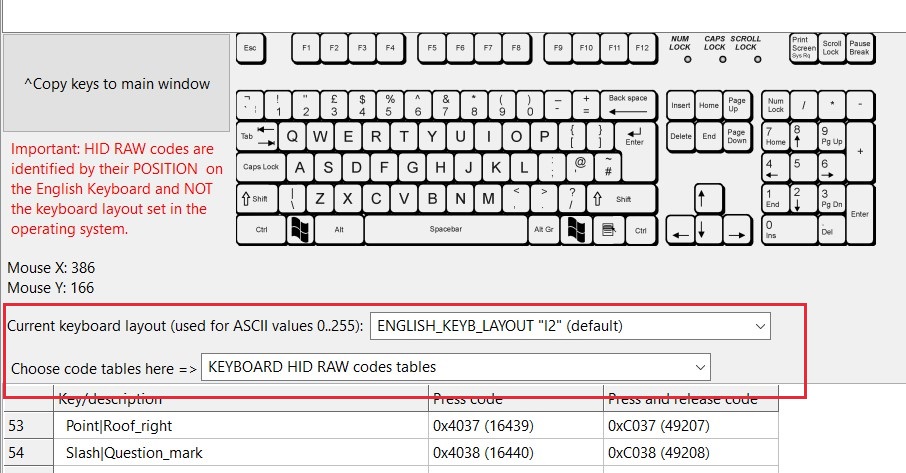
Notice: The USB module defines HID RAW codes exclusively via their position on the keyboard. In consequence, they do not rely on any ASCII interpretation. ASCII codes do not include any function keys and depend on your file system’s code interpretation. For programming success, you must select the keyboard layout matching the keyboard which you want to simulate with the USB module.If you are not sure yet which keyboard you are going to simulate, you should select the codelist “HID RAW codes”.
- Select your preferred “Press code” or “Press and release code” from the code list. For this example, select the “Press” code for the Windows key “LEFT_GUI”. If you select a “Press code”, the GUI does not automatically create a release code in the main window. You usually select press codes for parallel keystrokes.If you select a “Press and release code”, the GUI automatically adds a hold and release code in the main dialogue. You usually select press and release codes for key sequences.
- Copy the “Press code” for “LEFT_GUI” and return to the main window. Paste it into the field DATA 1.
- Now select the field DATA 2 and repeat the steps 4 to 7 with the “Press code” for “r”.
- Check the field Interpretation to verify your result.
- Move on to the index row idx 1 and select the command type 5-DelayMS (delay in milliseconds).
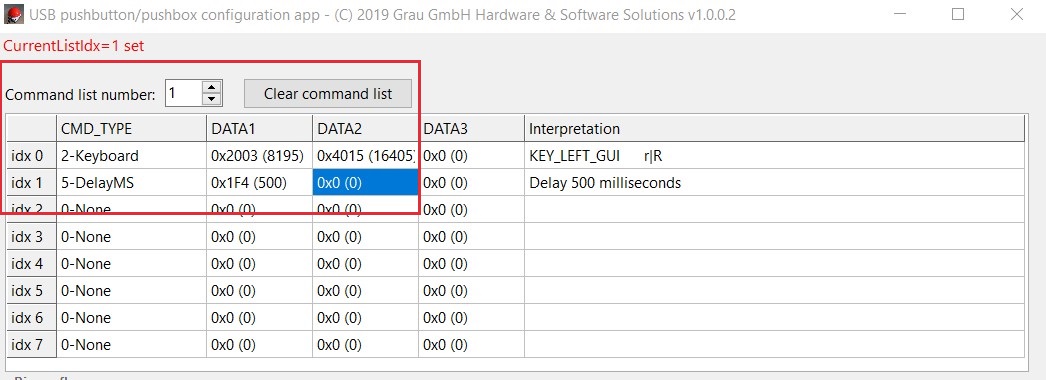
- Enter the value “500” into the field DATA 1 and check the field Interpretation to verify your result.
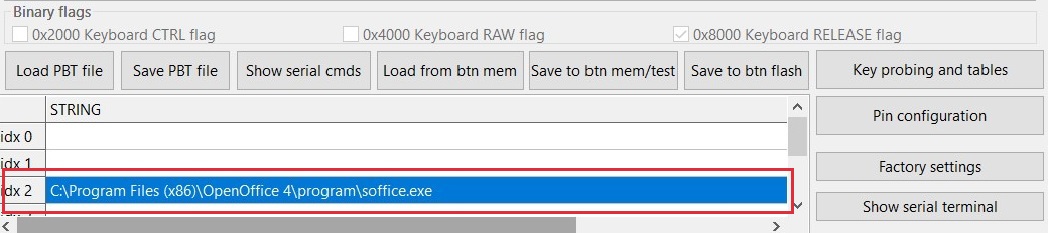
- Move on to the index row idx 2. Then select the command type 3- typeString in order to enter a string into the main window.
- Copy your string (here: the programme path) into the input field at the bottom of the dialogue. For programme paths, you might have to add “programme name.exe (or other ending for Mac)” manually at the end of the string.
- Make sure to choose the column with the correct index number (here: idx 2) and press “Return/Enter”.
- Enter the value “0x2 (2)” into the field DATA 2. “2” refers to the current index number.
- Move on to the index row idx 3. Select the command type 2- Keyboard. Then select the field DATA 1.
- Click on Key Probing and Tables. Repeat the steps 4 to 7 with the “Press and release code” for “Return/Enter”.
- Check the field Interpretation to verify your result.
- Click on Save to btn mem/test in order to temporarily store your USB module’s new configurations for testing. The GUI saves the newly set configurations in your USB module’s internal memory without flashing the module. This means that you can still correct and adapt the configurations.
- Push the button(s) included in your USB module in order to verify your programming success.
In the best case, the USB module opens the programme “OpenOffice” with 500 milliseconds delay on your computer. Otherwise you need to check your configurations, correct and save them again. Your current configurations are now listed in the Form Serial Explorer (via Show serial cmds) and can be viewed and modified in the serial terminal.
- Return to the main dialogue.
- Click on Save to btn flash if you permanently want to save the new configurations in your USB module’s internal flash memory. Do not immediately flash the module if you are going to change the stored configurations again.
You have successfully customized your USB module. The module now directly opens the programme OpenOffice on your computer through a push.
Programming examples for the USB module (Windows)
In the following section, you get familiar with various user scenarios which you can simulate with a USB module. All programming examples only refer to a Windows file systems, the programming settings differ for Linux and Mac users. There are two helpful tips before you sta
Helpful tips for programming your USB module
- If you want to be sure that all keyboards emulated by the USB module support your configurations, always select the code table “KEYBOARD HID RAW codes tables”.
- ASCII-based code tables do not include Windows function keys and thus cannot always be emulated by all USB modules. However, they work well with letters or numbers.
- Also note that the USB module always defines a code according to its position, by its interpretation via an operating system. So enter the correct position code if a letter is located differently on another keyboard to be used. For example, there are different key positions if one compares an English keyboard to a German one.
- For keyboard commands, it is always the easiest way to use the GUI’s input field under Key Probing and Tables.
- Do not forget to save your configurations both temporarily via Save to btn mem/test, or, after testing, permanently via Save to btn mem/flash.
- In case your GUI puts out wrongly programmed results and you cannot delete incorrect command lists via Clear command list, click on Factory settings in order to reset your USB module.
- In case the strings you typed in do not work, check the keyboard layout in your GUI and adjust it to your current keyboard type. Compatibility issues can occur if you have selected an English keyboard type, but type in keys on a German one. These compatibility issues are based on a different ASCII interpretation depending on your operating system.
- With programme paths, it can be necessary to manually add the programme file to the path in the format “\programme.exe” (Windows, different name ending for Mac).
- With HID consumer keys, It can happen that your GUI displays a different operation in the Interpretation column although you entered the correct key combinations or codes. The HID key codes you selected can also be Unassigned. This is not a GUI error – your keyboard simply might not dispose of such a key or the key is located at a different position, depending on your operating system.
- If your keyboard does not include a certain HID consumer button, also check and adapt your computer’s energy management and try a workaround solution. For example, you can search a keyboard-compatible key combination in a hot key list for Windows or Mac.
- Always verify if you have selected the correct keyboard layout and code tables under Key probing and tables.You can save time and programming efforts if you use an existing pushbutton template. A pushbutton template is a functioning sample configuration for your USB module. All available pushbutton templates are located under Load PBT file.
- If you want to use a certain configuration more often, you can also save it as a template under Save PBT file. Doing this, you make the new pushbutton template available for further user scenarios.
General functions in the operating system simulated with the USB module
Opening the Windows disk manager (Windows key, R, 500 ms delay, type string: diskmgmt.msc, Return/Enter)

- idx 0 – CMD_TYPE:2-Keyboard, DATA 1:key LEFT_GUI, DATA2: key R, DATA 3: Release all keys (automatic release)
- idx 1 – CMD_TYPE: 5-DelayMS, DATA 1: 500, DATA 2 and DATA 3: 0x0 (0) (= no action)
- idx 2 – CMD_TYPE: 3 – typeString, DATA 1-DATA 3: 0x0 (0), string: diskmgmt.msc
- idx 3 – CMD_TYPE: 2 – Keyboard, DATA 1: key Return/Enter, DATA 2: Release all keys, DATA 3: 0x0 (0)
Cycling Windows (key combination Ctrl, Alt, Esc)
- direct key programming via Key Probing and Tables
- entries in the input field: Ctrl, Alt, Esc (pressed and released simultaneusly)
- copying to the main dialogue via Copy keys to main window
Three single “Enter” with instant release (three times Return/Enter in sequence)
- direct key programming via Key Probing and Tables
- entries in the input field:three times Return/Enter
- copying to the main dialogue via Copy keys to main window
Left operating system key (hold and release)
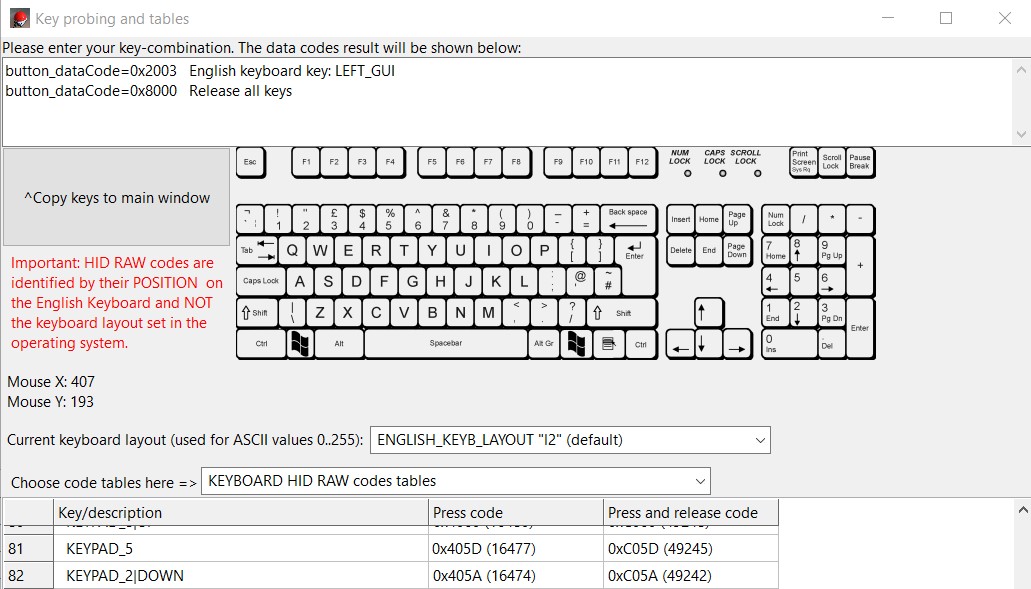
- direct key programming via Key Probing and Tables
- entries in the input field:left Windows key (differs for Mac and Linux users)
- copying to the main dialogue via Copy keys to main window
Opening Windows Task Manager(keys Ctrl, Shift, Esc)
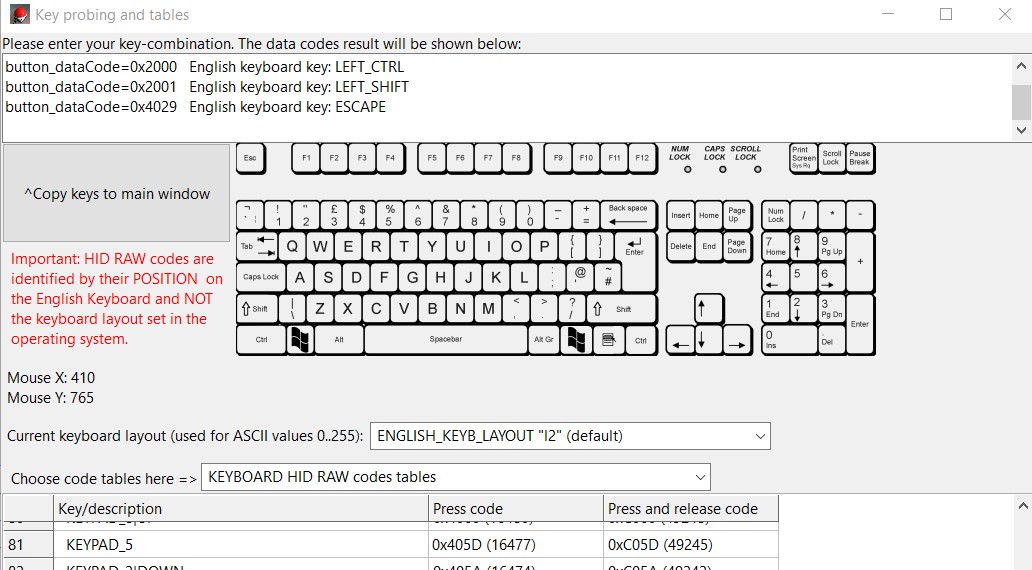
- direct key programming via Key Probing and Tables
- entries in the input field: Ctrl, Shift, Esc
- copying to the main dialogue via Copy keys to main window
Opening programmes in Windows (Windows +R, delay 500 ms, type string: “programme path”, Return/Enter)
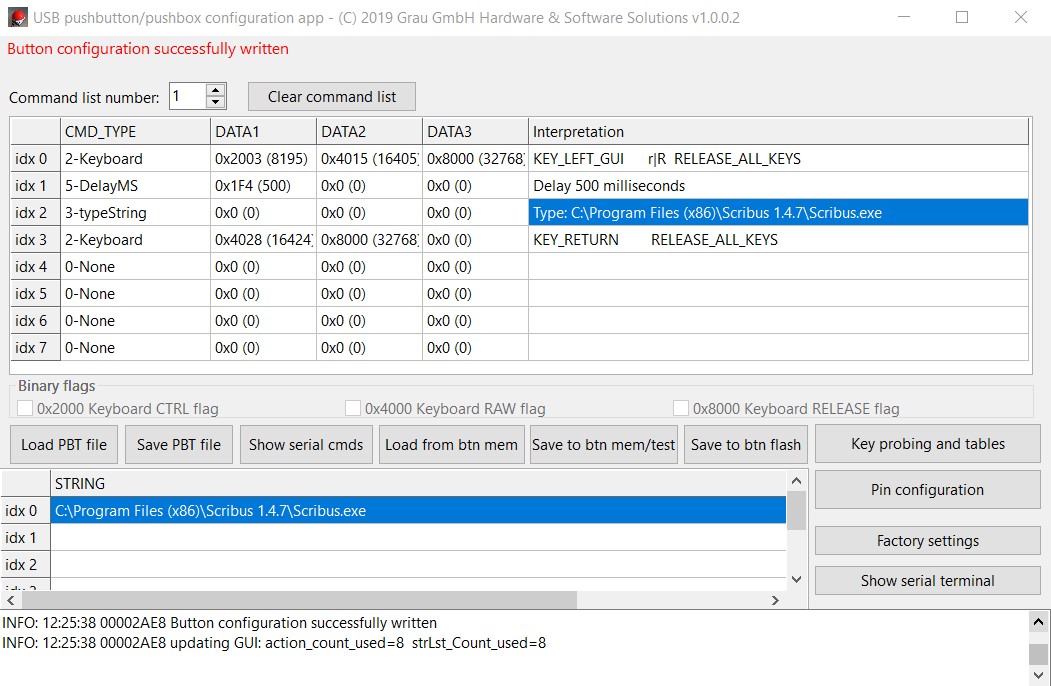
- idx 0 – CMD_TYPE:2-Keyboard, DATA 1:key LEFT_GUI, DATA2: key R, DATA 3: Release all keys (automatic release)
- idx 1 – CMD_TYPE: 5-DelayMS, DATA 1: 500, DATA 2 and DATA 3: 0x0 (0) (= no action)
- idx 2 – CMD_TYPE: 3-typeString, DATA 1-DATA 3: 0x0 (0), string: “programme path”
- idx 3 – CMD_TYPE: 2-Keyboard, DATA 1: key Return/Enter, DATA 2: Release all keys, DATA 3: 0x0 (0)
Opening a new window (Ctrl, – , N in sequence)
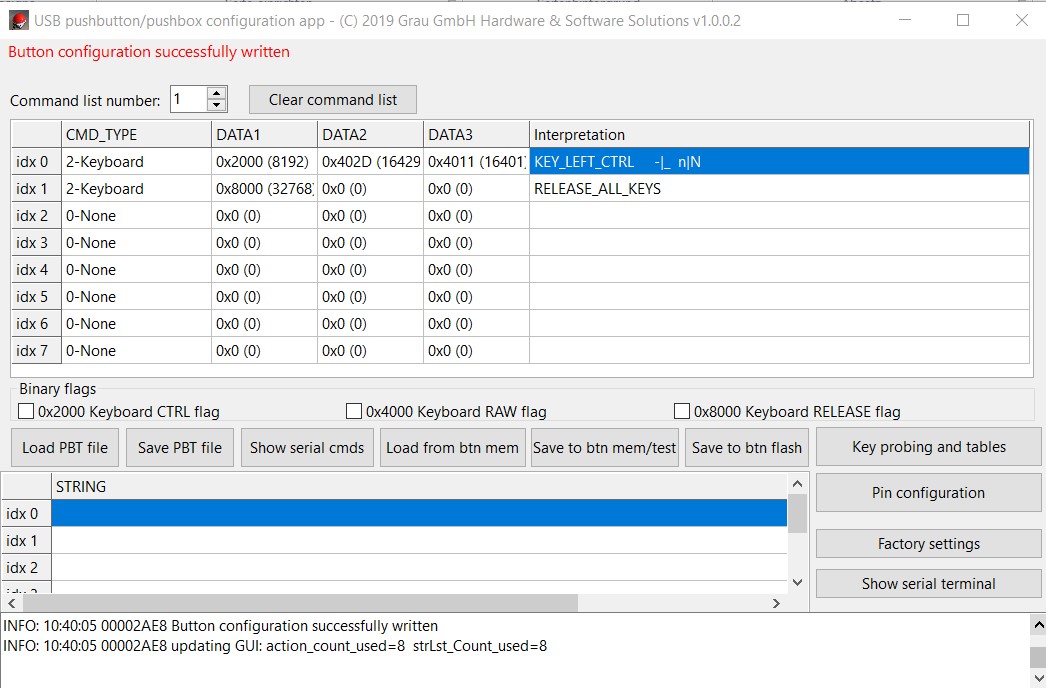
- idx 0 – CMD_TYPE:2-Keyboard, DATA 1:key LEFT_CTRL, DATA2: key -|_, DATA 3: key n|N
- idx 1 – CMD_TYPE: 2-Keyboard, DATA 1: Release all keys, DATA 2 and DATA 3: 0x0 (0) (= no action)
Opening a new tab (Ctrl, – , T in sequence)

- idx 0 – CMD_TYPE:2-Keyboard, DATA 1:key LEFT_CTRL, DATA2: key -|_, DATA 3: key t|T
- idx 1 – CMD_TYPE: 2-Keyboard, DATA 1: Release all keys, DATA 2 and DATA 3: 0x0 (0) (= no action)
Windows logout (keys Windows + L)
- direct key programming via Key Probing and Tables
- entries in the input field: Windows key + L (simultaneously)
- copying to the main dialogue via Copy keys to main window
Re-opening a tab in Firefox (Ctrl, – Shift, -, T in a sequence)
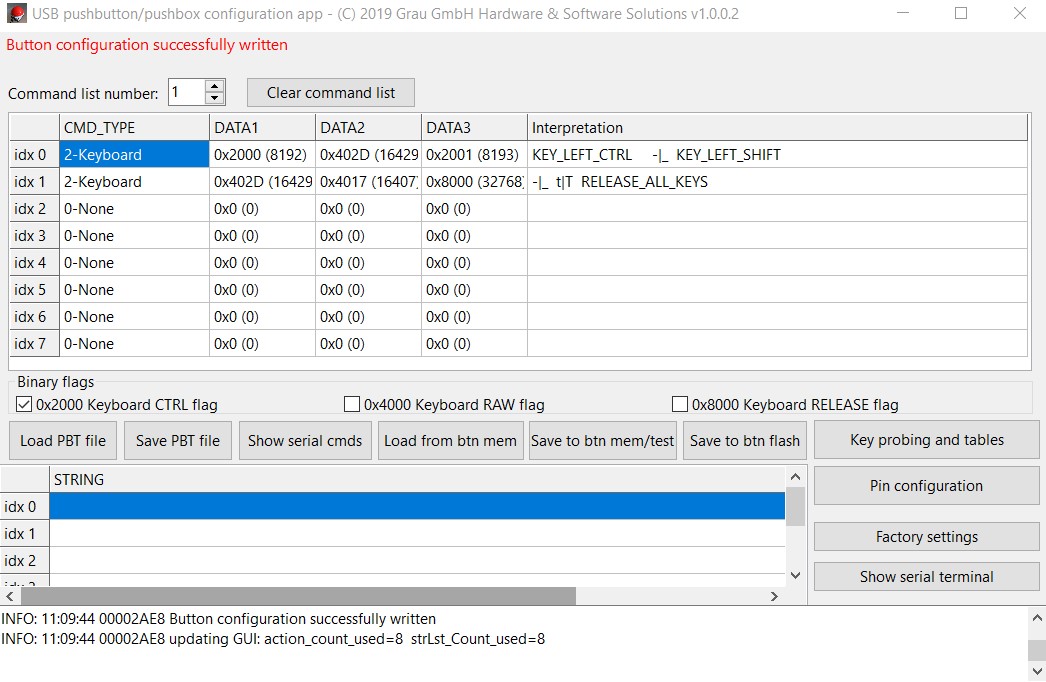
- idx 0 – CMD_TYPE:2-Keyboard, DATA 1:key LEFT_CTRL, DATA2: key -|_, DATA 3: key LEFT_SHIFT
- idx 1 – CMD_TYPE: 2-Keyboard, DATA 1: key -|_, DATA 2: key t|T, DATA 3: Release all keys
Sound functions and media replay simulated with the USB module
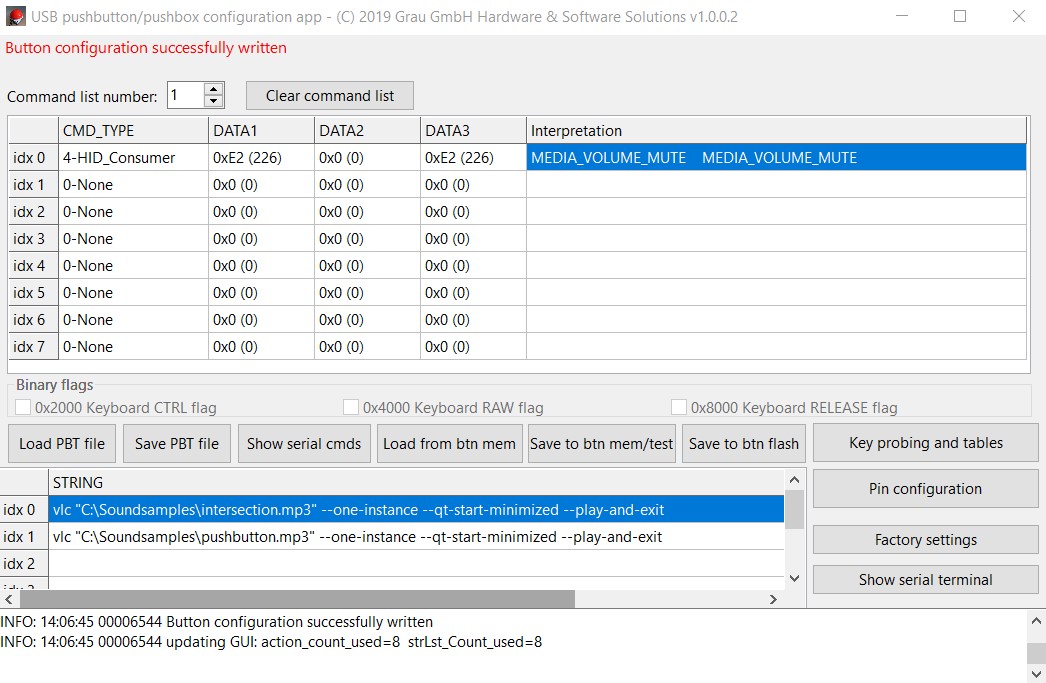
Muting and unmuting sound (1st/2nd trigger toggle)

- idx 0 – CMD_TYPE:4-HID_Consumer, DATA 1:key MEDIA_VOLUME_MUTE, DATA2: 0x0 (0), DATA 3: 0x0 (0)
Sound pause on button hold (mute on trigger, unmute on release)
- idx 0 – CMD_TYPE:4-HID-Consumer, DATA 1: key MEDIA_VOLUME_MUTE, DATA2: 0x0 (0), DATA 3: key MEDIA_VOLUME_MUTE
Increasing sound volume (with repetition on hold)

- idx 0 – CMD_TYPE:4-HID-Consumer, DATA 1: key MEDIA_VOLUME_UP, DATA2: 0x0 (0), DATA 3: 0x0 (0)
Decreasing sound volume (with repetition on hold)
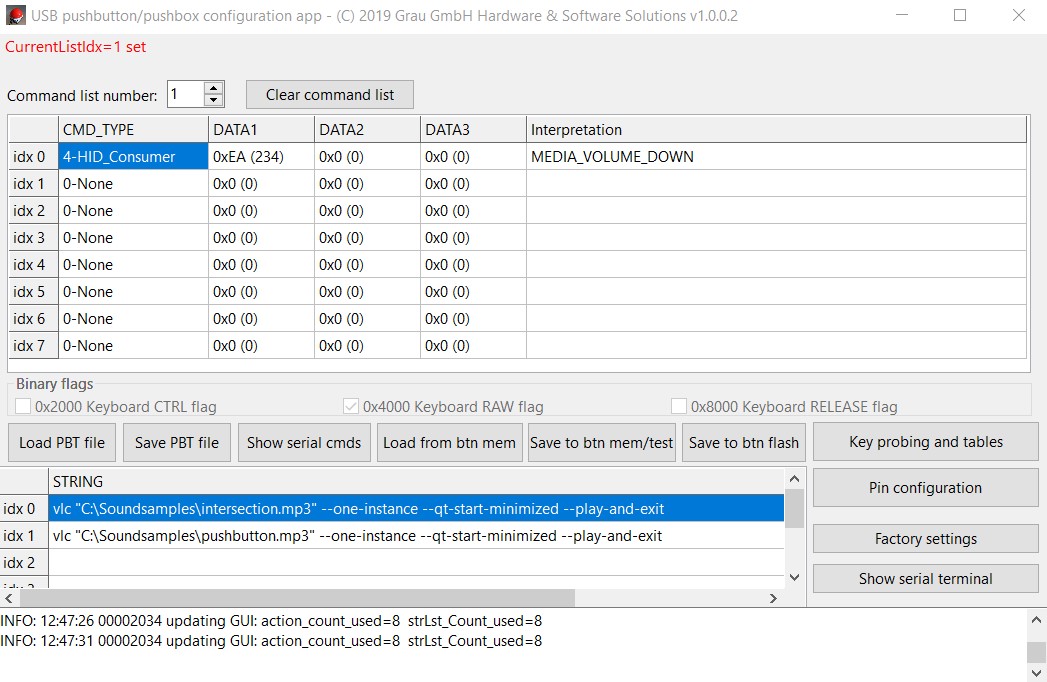
- idx 0 – CMD_TYPE:4-HID-Consumer, DATA 1: key MEDIA_VOLUME_DOWN, DATA2: 0x0 (0), DATA 3: 0x0 (0)
Playing and replaying sound with VLC (“Windows key+ r; 500ms delay; VLC “soundpath”; Enter in command list 1; change command list to 2; p in command list 2”)
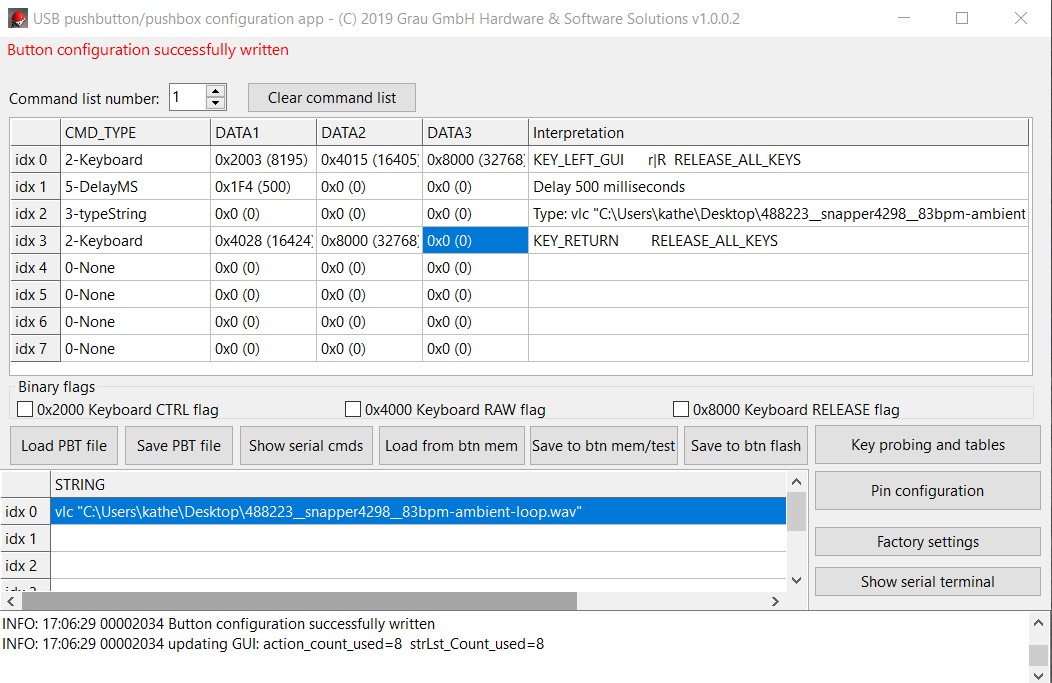
- Table entries for command list 1:
- idx 0 – CMD_TYPE:2-Keyboard, DATA 1:key LEFT_GUI, DATA2: key r|R, DATA 3: Release all keys
- idx 1 – CMD_TYPE: 5-DelayMS, DATA 1: 500, DATA 2 and DATA 3: 0x0 (0) (= no action)
- idx 2 – CMD_TYPE: 3-typeString, DATA 1-DATA 3: 0x0 (0), string: ” VLC soud path”
- idx 3 – CMD_TYPE: 2-Keyboard, DATA 1: key Return/Enter, DATA 2: Release all keys, DATA 3: 0x0 (0)
- Additional table entries or command list 2:
- idx 0 – CMD_TYPE: 2-Keyboard, DATA 1: key “p|P”, DATA 2: “Release all keys” (automatic), DATA 3: 0x0 (0) (= no action)
PowerPoint functions simulated with the USB module
Starting a PowerPoint presentation from the current slide (key combination “Shift+-+F5”)
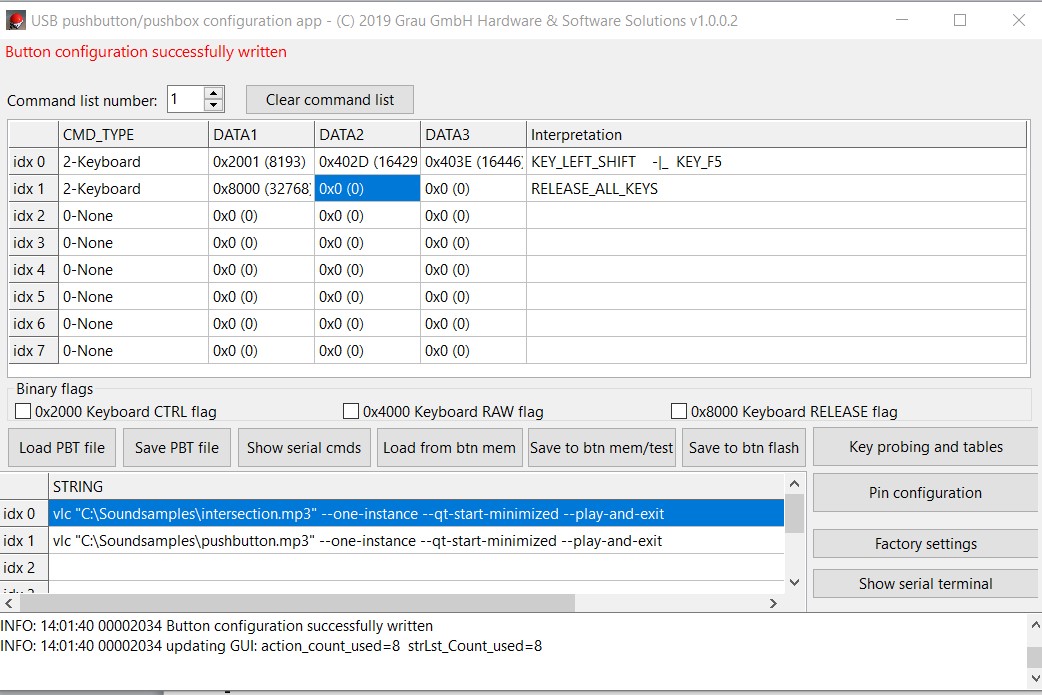
- idx 0 – CMD_TYPE:2-Keyboard, DATA 1:key LEFT_SHIFT, DATA2: key -|_, DATA 3: key F5
- idx 1 – CMD_TYPE: 2-Keyboard, DATA 1: Release all keys, DATA 2 and DATA 3: 0x0 (0) (= no action)
Starting presentations and switching slides in Power Point – option 1 (key “Space”)
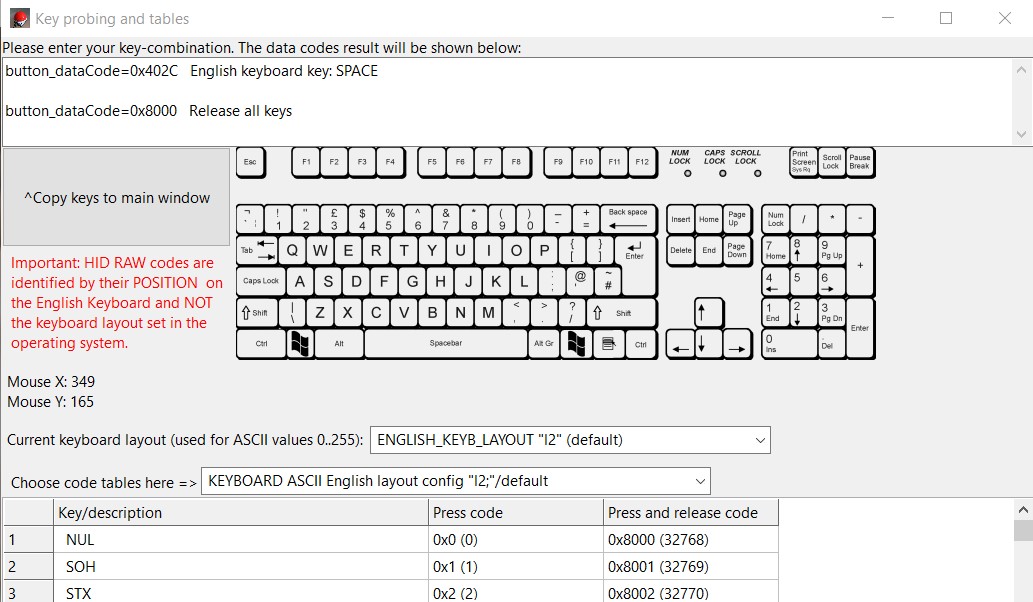
- direct key programming via Key Probing and Tables
- entries in the input field: Space
- copying to the main dialogue via Copy keys to main window
Starting presentations and switching slides in PowerPoint – option 2 (key “Return/Enter”)
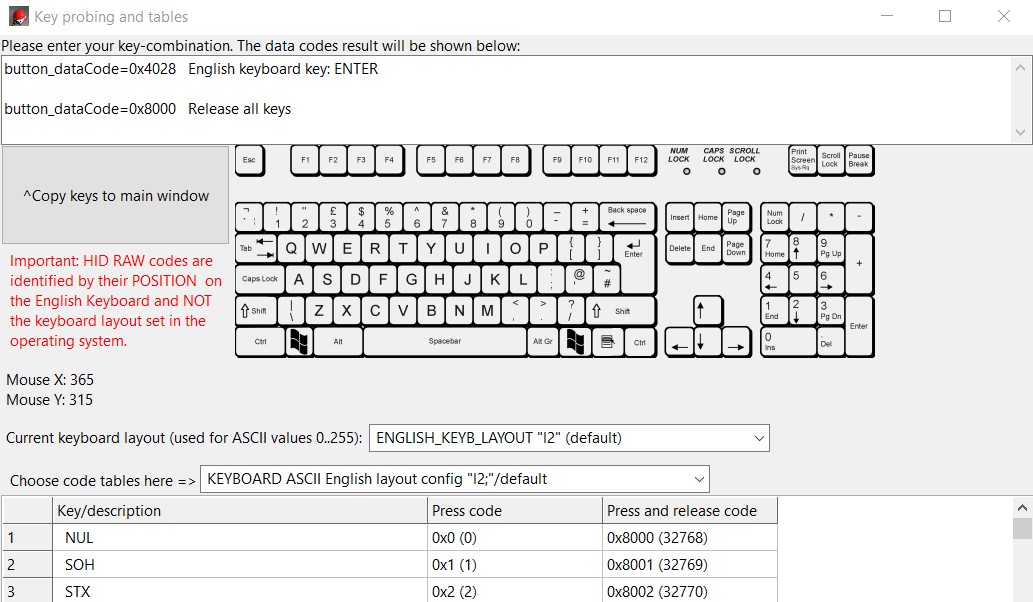
- direct key programming via Key Probing and Tables
- entries in the input field: Return/Enter
- copying to the main dialogue via Copy keys to main window
Moving forward in a PowerPoint presentation(key “Arrow right”

- direct key programming via Key Probing and Tables
- entries in the input field: Arrow right
- copying to the main dialogue via Copy keys to main window
Moving backwards in a PowerPoint presentation(key “Arrow left”)
- direct key programming via Key Probing and Tables
- entries in the input field: Arrow left
- copying to the main dialogue via Copy keys to main window
Navigate to the product pages of the USB pushbutton and USB pushbox to get more general information about your USB module. Download and read our latest user manual if you want to learn more about the GUI’s options or about the USB module’s technical properties,limitations and fields of use. If you are an experienced programmer, you might even work faster without a GUI. In this case, take a look at our programming examples based on command lines.