There’s still a lot of prejudice in “big business” against Arduino solutions. One point of criticism is surely that Arduino hardware software come from an open source platform. This fact makes the system “imperfect”, occasionally “unsafe” and more difficult to design at first sight. However, do you dare taking a second glance? In the following article, you’ll learn about the advantages and chances which might balance Arduino’s weak points in B2B environments.
Arduino - for makers and small startups only?
Why should "big players" even consider Arduino?
First of all, the Arduino system offers a great environment for innovation at a low-cost basis. So it does not surprise anyone that Arduino perfectly covers the need of tech start-ups around the world. By the way, “low cost” does not equal “low budget”, as this term is often used with the dismissive connotation of outcomes with lower quality standards.
We’d like to stress this difference here because the quality of Arduino products and projects always depends on the user scenario and the programmers’ expertise. If your IT team designs and implements an project correctly and matching its purpose, Arduino solutions can easily contribute to a well-working IT infrastructure.
Arduino “behind the scenes”
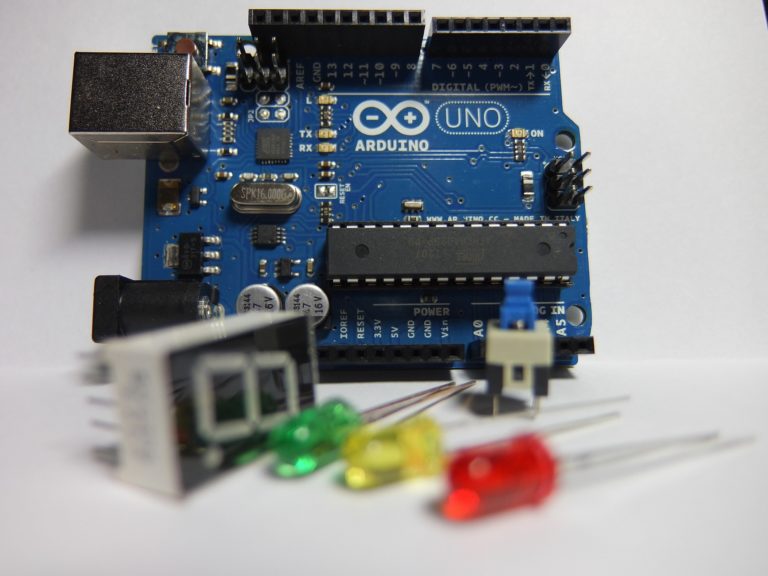
The Arduino ecosystem includes both hardware and software aspects which perfectly work together. It was designed as an open platform for everyone with individual hardware and software projects and even includes its own programming language (C or C++ based) for an easier handling. All hardware components and circuit boards can be used within many IoT settings. For example, we and our partner companies rely on Arduino technology for our USB pushbuttons, USB pushboxes and all solutions concerning robotic lawn mowers.
Boards and pins: some “hard facts”
There are many components that you can equip your Arduino board with, for sure. Basically, every board includes the following components.
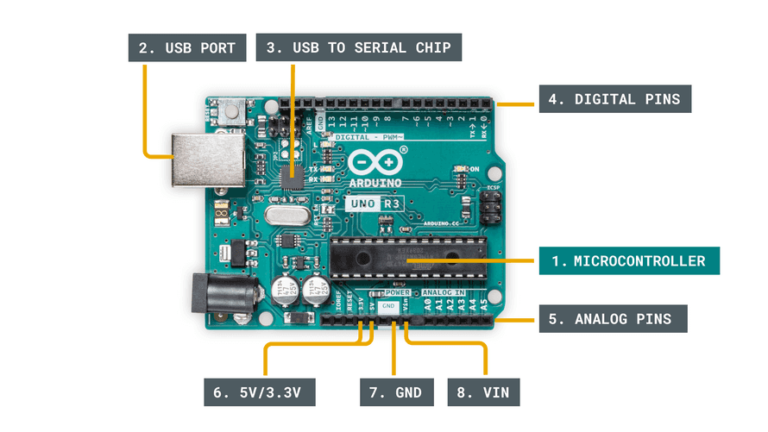
Microcontroller -the “brain and memory” of an Arduino which we load programs into. It works like a tiny computer with a limited amount of operations.
USB port – connects your Arduino board to a computer.
USB to Serial chip – helps translating data transmitted from another device to the on-board microcontroller.
Digital pins – use digital logic (0,1 or LOW/HIGH). You commonly use them for switches and to turn on/off an LED.
Analog pins – read analog values in a 10 bit resolution (0-1023).
5V / 3.3V pins – power external components.
GND – ground, negative or you simply use it to complete a circuit where the electrical level is at 0 volt.
VIN – stands for Voltage In, where you can connect external power supplies.
Basic operations as a starting point
As a so-called “basic operation”, every board has a single program implemented into the microcontroller. This microcontroller executes the single action in question automatically in microseconds. A “basic operation” depends on the integrated program and includes reading a sensor, turning on a LED, checking on a condition or combining all of them.
Arduino boards at a glance (copyright: free Arduino documentation)
Circuits and signals
A circuit is always a matter of pins and wires when it comes to Arduino boards. Basically, for a LED circuit, you just need to connect a selected pin to a GND pin. At a LOW state, the LED stops glowing until the current flow moves on to a HIGH state again. Circuits are typically represented as schematics, which are the blueprints for your circuit.
Analog and digital signals are another important aspect of all electronic circuits. With no exceptions, analog signals are generally bound to a range. In an Arduino, this range is typically 0-5V, or 0-3.3V. With a potentiometer (an analog component used to change the resistance of a circuit), we can manually adjust this range (0-5V). In the Arduino program, this is represented in a range of 0-1023 (10-bit resolution). For example, by writing an analog signal using Pulse-Width Modulation (PWM), you can use a range between 0-255, as we are using an 8-bit resolution.
Bitstreams with digital signals
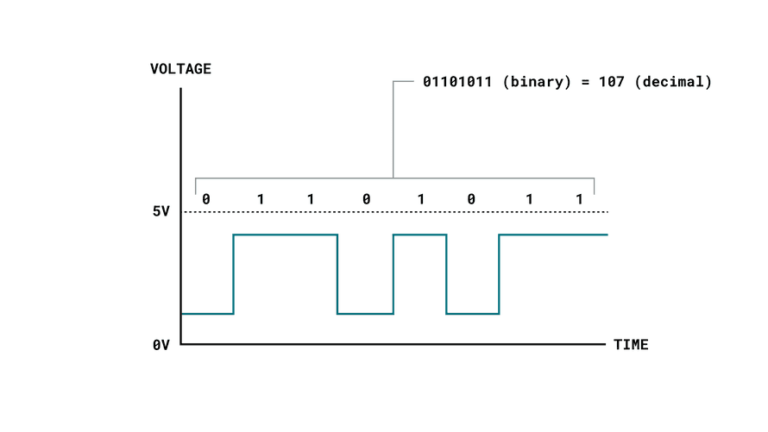
In contrary, a digital signal represents only two binary states (0 or 1) that are read as high or low states in the program. This is the most common signal type in modern technology. Thus it is easy to read and write digital signals on an Arduino. Digital signals might seem very basic (just 0 or 1), but are actually way more advanced. For example, you can create a binary sequence (also: bitstream) by sending a high or low state rapidly a number of times.
Digital signals created with an Arduino board (copyright: free Arduino documentation)
How sensors and actuators work
Working with Arduino always means sensors and actuators. So it is important to know the difference between these elements. In simple terms, a sensor records a physical parameter and converts it into an electronic signal. For example, when a circuit state changes after you pressed a button, the electronic signal is switched from low to high (0 to 1). In fact, we find this principle in many electronic devices in daily life, like in vacuum cleaners and microwaves. There are digital and analog sensors on each Arduino board.
An actuator effectively changes a physical state. Some common examples are LEDs, motors and switches. Generally, actuators convert electric signals into e.g. radiant energy (light) or mechanical energy (movement). How actuators are controlled really depends on the component in question. One simple way is to simply turn something on/off, while more advanced is controlling the amount of voltage a component receives. In a nutshell, a sensor senses and transmits input triggers while actuators transform these triggers into an effective output.
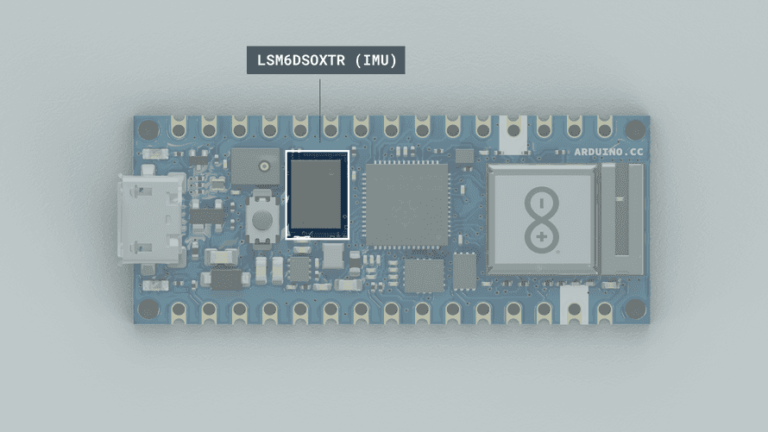
Newer Arduino boards have embedded sensors (copyright: free Arduino documentation)
From a simple memory to WiFi and IoT
The Arduino ecosystem includes several types of serial protocols, especially when transmitting data of digital signals. Among all protocol types, UART, SPI & I²C are most common. Serial communication runs via a so-called serial bus, which is attached to a specific pin. Apart from the protocols, Arduino boards naturally have a memory, which is usually a SRAM or flash memory.
While an SRAM memory automatically resets after being switched off, a flash memory doesn’t and keeps all saved data. How much memory is available on an Arduino varies from board to board. In order to save programming work, you can also use a board with an embedded sensor. This is particularly common with newer Arduino boards.
The power of embedded sensors
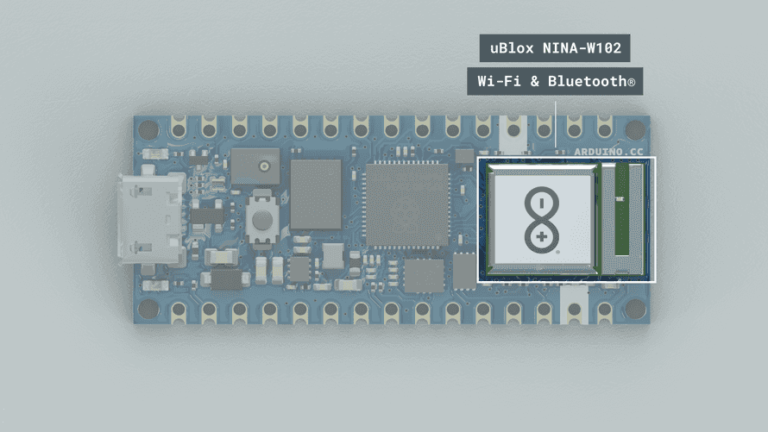
For example, the Nano 33 BLE Sense has 7 embedded sensors, but is only 45x18mm (the size of a thumb). All these sensors are connected via the I²C protocol and have a unique address. Another feature which makes Arduino boards the perfect fit for IoT projects is an embedded radio module. Maybe you already know these modules as Wi-Fi, Bluetooth®, LoRa®, GSM, NB-IoT, but there are many other options available depending on your requirements. Just like serial protocols, radio modules use their own set of protocols to communicate, such as HTTP, MQTT and UPD.
Circuit board with WiFi module (copyright: free Arduino documentation)
Arduino boards – buzzwords for programming
When you program Arduino tools, you always need to consider both the hardware and software level to achieve satisfying results. As mentioned before, there’s a programming language for Arduino projects. It is called The Arduino API and it consists of several functions, variables and structures based on the C/C++ language. In a nutshell, functions control the board, variables reflect the constants, data types and conversion and the structure contains the elements of (C++) code. At this point, we can’t dive deeply into every detail on Arduino projects (“sketches”), “void loops”, “void setups” and “Core Specific API”. Just check out the original Arduino documentation!
IDE versions for everybody
In addition to hardware aspects, another integral part of the ecosystem are its software tools. The Arduino IDE, as it is commonly referred to, is an integrated development environment. In order to program your board, you need to write a program, compile that program into machine code, and finally: send over the new program to your board.
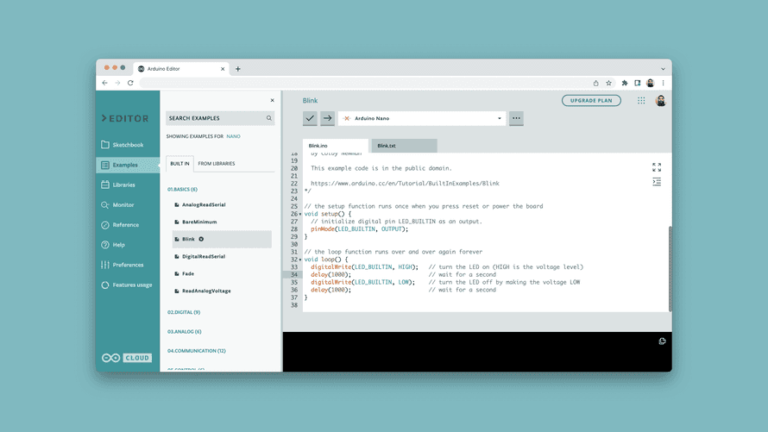
The Arduino IDE is a program, or application, that you can download (or use an online version), to manage all of your code development. Due to this support, everyone can learn how to get an Arduino project running, even without a lot of previous knowledge. These days, you can switch and select between three versions of Arduino IDE, which are IDE 1.8.x (classic), IDE 2.0.x (new) and Web Editor (online). You should also download libraries with ready-to-go code examples which make programming easier for you. Especially for bigger projects, you can also rely on the IoT Cloud.
Program your board directly in the Web Editor! (copyright: free Arduino documentation)
How to … get your first Arduino project started!
Preparing an Arduino board and uploading code on it usually follows a step-by-step procedure. This is what the Arduino documentation describes as a “typical workflow”.
Install your board! This means installing the right Core Specific API for your board. Otherwise you cannot use it. You can install the “package” directly within the IDE.
Create a new sketch! A sketch is the main program file for your project. Basically, it includes the instructions which the microcontroller is to execute.
Compile your sketch! In this step, you check your code for errors, and convert it into a binary file (1s and 0s). If something fails, the error console alarms you. Please consider that the written code is not exactly how it looks like when you uploaded to your Arduino.
Upload your sketch! After a successful compilation you can upload the code to your board. In this step, you connect the board to the computer physically, and select the right serial port.
Tip: Use the Serial Monitor (optional)! For most Arduino projects, it is important to know what’s happening on their boards. The Serial Monitor tool available in all IDEs allow for data to be sent from your board to your computer.
Six good reasons to use Arduino in “big business”
Are you still wondering if and why Arduino-based projects can be an option for your company? First of all: Not everyone might profit from it and there is never the “one and only” way to success. However, you should definitely know about the arguments FOR this very common and established open source platform.
It is free! Especially small companies need to keep an eye on their development expenses, but bigger companies do, too.
Most developers handle it easily! The open source platform platform makes it very easy for developers to create their individual projects within the different IDE versions.
It has become a standardized and connected system! To be honest, the first versions of Arduino required a lot of difficult operations and thus required a lot of programming expertise. In contrary, nowadays and especially thanks to the newer IDEs, Arduino has become sort of “a platform for everybody”.
With a versatile IDE you've always got your hands on your coding projects!
You can monitor, control and change any code in your projects. Some people in business might prefer ready-to-go solutions and don’t need to dive deeper into their IT infrastructure. Many commercial IT systems and solutions come with a guarantee that everything works. However, the user cannot go for any self-help in certain cases when these solutions do not work. Here’s the great advantage of Arduino projects. Although you might have to make a little more effort at first glance (and occasionally go for some debugging), you remain in full control over your coding projects.
It is versatile and covers many business branches! Whether you’re restructuring your production line, create IoT- based hardware projects like our partner companies or work in the house automation or HVACR sector – Arduino can help you.
The Arduino community is more than a digital village. Although, like many open source innovations, the Arduino platform once started out as some nerdy maker circle, it has grown up to a great community of programming experts. In consequence, the platform is optimized and actualized on a regular basis – all around the world! Every developer can both contribute to and profit from the IDEs, IoT Cloud solutions, libraries and more.
Are you happy with your Arduino projects?
Have you already used Arduino tools for your hardware and software projects? Which challenges and advantages do YOU see with this platform? As a company using Arduino solutions, we’re curious to hear about your business and user experience.
We use cookies on our website to give you the most relevant experience by remembering your preferences and repeat visits. By clicking “Accept”, you consent to the use of ALL the cookies.
This website uses cookies to improve your experience while you navigate through the website. Out of these, the cookies that are categorized as necessary are stored on your browser as they are essential for the working of basic functionalities of the website. We also use third-party cookies that help us analyze and understand how you use this website. These cookies will be stored in your browser only with your consent. You also have the option to opt-out of these cookies. But opting out of some of these cookies may affect your browsing experience.
Necessary cookies are absolutely essential for the website to function properly. These cookies ensure basic functionalities and security features of the website, anonymously.
Cookie
Dauer
Beschreibung
cookielawinfo-checbox-analytics
11 months
This cookie is set by GDPR Cookie Consent plugin. The cookie is used to store the user consent for the cookies in the category "Analytics".
cookielawinfo-checbox-functional
11 months
The cookie is set by GDPR cookie consent to record the user consent for the cookies in the category "Functional".
cookielawinfo-checbox-others
11 months
This cookie is set by GDPR Cookie Consent plugin. The cookie is used to store the user consent for the cookies in the category "Other.
cookielawinfo-checkbox-necessary
11 months
This cookie is set by GDPR Cookie Consent plugin. The cookies is used to store the user consent for the cookies in the category "Necessary".
cookielawinfo-checkbox-performance
11 months
This cookie is set by GDPR Cookie Consent plugin. The cookie is used to store the user consent for the cookies in the category "Performance".
viewed_cookie_policy
11 months
The cookie is set by the GDPR Cookie Consent plugin and is used to store whether or not user has consented to the use of cookies. It does not store any personal data.
Functional cookies help to perform certain functionalities like sharing the content of the website on social media platforms, collect feedbacks, and other third-party features.
Performance cookies are used to understand and analyze the key performance indexes of the website which helps in delivering a better user experience for the visitors.
Analytical cookies are used to understand how visitors interact with the website. These cookies help provide information on metrics the number of visitors, bounce rate, traffic source, etc.
Advertisement cookies are used to provide visitors with relevant ads and marketing campaigns. These cookies track visitors across websites and collect information to provide customized ads.